Build a To-do list app
Let's create a simple to-do list application in DotVVM. The application will allow users to add new tasks, mark them as complete, and delete tasks. This is a great first project to learn the fundamentals of DotVVM including data-binding, event handling, and viewmodels.
Prerequisites
- You have created a new DotVVM project and understand the basic project structure.
- You are familiar with the first page concepts including views and viewmodels.
- You have a basic understanding of C# and HTML.
Step 1: Create the viewmodel
First, we'll create a viewmodel to handle the to-do list logic. Add a page called TodoList.dothtml into the Views folder. The ViewModels/TodoListViewModel.cs file should be created automatically.
Update it to look like this (replace YourProjectName with your project name):
using System;
using System.Collections.Generic;
using System.Linq;

namespace YourProjectName.ViewModels
{
    public class ToDoListViewModel : MasterPageViewModel
    {
        public List<TodoItem> Todos { get; set; } = new();

        public string NewTodoTitle { get; set; }

        public void AddTodo()
        {
            if (string.IsNullOrWhiteSpace(NewTodoTitle))
            {
                return;
            }

            Todos.Add(new TodoItem
            {
                Id = Guid.NewGuid(),
                Title = NewTodoTitle,
                IsCompleted = false,
                CreatedAt = DateTime.Now
            });

            NewTodoTitle = string.Empty;
        }

        public void DeleteTodo(Guid id)
        {
            var todo = Todos.FirstOrDefault(t => t.Id == id);
            if (todo != null)
            {
                Todos.Remove(todo);
            }
        }
    }

    public class TodoItem
    {
        public Guid Id { get; set; }
        public string Title { get; set; }
        public bool IsCompleted { get; set; }
        public DateTime CreatedAt { get; set; }
    }
}
Step 2: Create the view
By default, the ToDoList.dothtml page is using a master page to have a shared header and footer for all pages.
To keep things simple, we'll not use it for now. Remove everything in the page and use the following code (just replace YourProjectName with your project name):
@viewModel YourProjectName.ViewModels.ToDoListViewModel, YourProjectName

<!DOCTYPE html>
<html lang="en">
<head>
    <meta charset="utf-8" />
    <title>To-do List</title>
    <meta name="viewport" content="width=device-width, initial-scale=1.0" />
    <link href="https://cdn.jsdelivr.net/npm/[email protected]/dist/css/bootstrap.min.css" rel="stylesheet" crossorigin="anonymous">
    <style>
    .todo-item {
        cursor: pointer;

        .completed {
            text-decoration: line-through;
            color: #999;
        }
    }
    </style>
</head>
<body>
    <div class="container">
        <h1 class="my-4">My To-do List</h1>

        <!-- Add New Todo Section -->
        <form class="input-group my-4">
            <dot:TextBox Text="{value: NewTodoTitle}"
                         Placeholder="Enter a new task..."
                         class="form-control" />
            <dot:Button Text="Add"
                        Click="{command: AddTodo()}"
                        IsSubmitButton="true"
                        class="btn btn-primary" />
        </form>

        <!-- Todos List -->
        <dot:Repeater DataSource="{value: Todos}">
            <EmptyDataTemplate>
                <div class="fst-italic text-secondary">
                    No tasks yet. Add one to get started!
                </div>
            </EmptyDataTemplate>
            <div class="border rounded px-3 py-2 d-flex flex-row align-items-center">
                <dot:CheckBox class="todo-item flex-grow-1"
                              Checked="{value: IsCompleted}">
                    <span class="ms-2"
                          Class-completed="{value: IsCompleted}">
                        {{value: Title}}
                    </span>
                </dot:CheckBox>

                <dot:Button Text="Delete"
                            Click="{command: _root.DeleteTodo(Id)}"
                            class="btn btn-sm btn-danger" />
            </div>
        </dot:Repeater>
    </div>
</body>
</html>
Step 3: Register the route
In the DotvvmStartup.cs file, add a route to register the new page. Find the ConfigureRoutes method and add the following line:
config.RouteTable.Add("TodoList", "todos", "Views/TodoList.dothtml", new { });
Step 4: Run the application
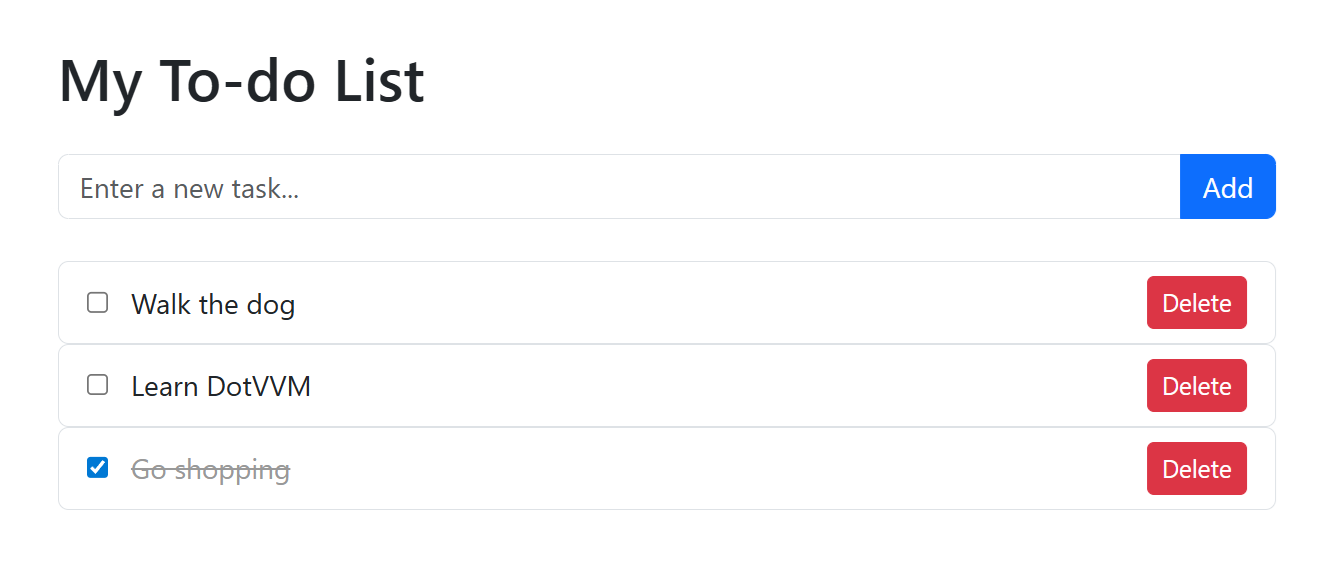
Press F5 to run the application and navigate to /todos in your browser. You should now see the to-do list application with the ability to add, complete, and delete tasks.
Understanding the code
The viewmodel
Todos: A
List<TodoItem>that holds all the to-do items. In contrast to WPF and other MVVM frameworks in .NET, you don't need to useObservableCollection- DotVVM will handle triggering the change notifications in the browser itself.NewTodoTitle: A property that binds to the text input field where users enter new tasks.
AddTodo(): This method is called when the user clicks the "Add" button. It creates a new
TodoItemand adds it to the collection.DeleteTodo(id): This method removes a task from the collection.
The view
dot:TextBox: A DotVVM control for text input, bound to the
NewTodoTitleviewmodel property.dot:Button: A DotVVM button control. The
Clickevent is bound to viewmodel commands.dot:Repeater: A control that renders a list of items. In this case, it displays all the to-do items from the
Todoscollection.Checked binding: The checkbox is bound to the
IsCompletedproperty, allowing two-way binding.class-
completedbinding: The element will have thecompletedCSS class when theIsCompletedproperty istrue; otherwise, the class will be removed._root: A special binding target that refers to the root viewmodel from within an item template. We use it when we want to call methods in the parent binding context (such as the
DeleteTodomethod).
Styling and customization
The example uses Bootstrap for styling. You can customize the appearance by:
- Modifying the CSS classes to use different Bootstrap components.
- Adding more properties to the
TodoItemclass (such as priority, due date, or tags). - Implementing filtering to show only completed or incomplete tasks.
- Adding persistence by saving to-do items to a database.